
If you’re ever gonna get your WordPress blog content ranked in Google for free targeted traffic, then it’s essential to learn the how to of SEO – properly optimizing your website for the search engines.

Failure to do so could potentially lead to money being left on the table, and I’m not just talking a measly few hundred bucks, but literally a life-changing income!
Yeah, sure, you’ve always got “social media” to fall back on. And if you’re super lucky, your content could go viral.
But do you really wanna put your eggs in just that one basket and leave your success to chance?
In my experience, SEO is “the” best option for driving free traffic to your blog. Period.
But before we get down to the nitty-gritty of implementing SEO techniques into your blog…
Table of Contents
What is SEO & Why is it so Important, Hey?
Put simply, SEO stands for ‘Search Engine Optimization’ which is the process of getting your blog posts listed on the first page unpaid results of the search engines, namely Google, Bing, and Yahoo.
When someone types a search term into Google, your blog post pops up on page 1 (somewhere between positions 1 and 10) for that keyword phrase.
For example, say somebody plugs the name of my site ‘zero to affiliate hero‘ into Google – it’s clearly visible on the first page (spot #1) of the search index results.
OK, number crunching time!
Imagine that you have 100 blog posts ranking on the first page of Google and each one brings you 1 visitor per day from 100 keyword searches.
That’s 100 daily visitors.
Now, what if each post gets 5 – 10 clicks on a daily basis, for example.
That’s a WHOPPING 500 – 1,000 visitors (free targeted traffic) landing on your blog each and every day, 7 days a week!
But what if you had 200, 300 or even 400 posts ranking in the search engines, huh?
If you’re promoting awesome products/services through high-quality content, can you imagine the insane volume of traffic and the potential affiliate commissions from working your ass off and implementing SEO?
But if you’re just getting started as a blogger, it will take time and patience to reach that stage.
As Buzz Lightyear says:
To INFINITY, And BEYOND!
Are you ready for multiple rankings, a stampede of visitors, and a full-time income from your WordPress blog?
And by the way, the steps I’m about to show you are the exact same ones I use for building a successful online business.
So, SHH, mum’s the word! 😉
OK, Let’s dive into the 8 SEO tasks:
Step #1: Do These 3 Things…
First things first, ensure that you have a personal domain name connected to your blog (i.e yourdomain.com) because it will be favored more than a free sub-domain.
Secondly, serve your site over 256-bit Encrypted Connections using (HTTPS). If you’re using (HTTP), Google will mark your site as unsafe.
Thirdly, make sure that your site loads super-quick and gets an awesome score from Google Page Speed Insights for both Desktop and Mobile versions because “speed” is now a ranking factor.
Having your own domain, HTTPS, and fast web hosting will give you the edge over those WordPress bloggers who don’t have those 3 components in place.
But don’t panic if you haven’t because my #1 recommendation will give you everything you need (including a free blog) for high rankings in the search engines.
Step #2: Install ‘All in One SEO’ Plugin
You must optimize your blog so it’s search engine-friendly and easier for Google to index and rank properly.
So, you’ll need to install and activate the ‘All in One SEO Pack plugin.
Once activated, mouse over the plugin in your dashboard sidebar and select ‘General Settings’.
Your final task is to update the ‘Home Page Settings’. For example:
Home Title: The title of your blog that shows up in the search engine index.
It should mirror your blog’s actual title, but also add an extension to entice folks to click.
Also, keep your title under 57 characters so the whole text is displayed in Google.
Home Description: This tells people what your site is all about and how they will benefit from visiting it.
Keep the description short and sweet (under 160 characters), but don’t spend all day trying to perfect it lol.
Then scroll to the bottom of the settings page and click on ‘Update Options’.
As for the other million and one SEO settings, leave as is because no further updates are required.
Step #3: Install ‘Google XML Sitemaps’ Plugin
By installing ‘Google XML Sitemaps’, your site will be properly indexed and Google will be able to crawl your entire site easier which can lead to better and faster rankings as your site grows.
When you’ve activated it, it will automatically create a sitemap for your blog.
To see your new sitemap, simply hover your cursor over the ‘Settings’ tab in your WP dashboard sidebar and click ‘XML Sitemap’
Your sitemap should appear as: yourdomainname.com/sitemap.xml.
As for your sitemap settings, you can change your options within a couple of sections if you wish. I guess it’s down to your personal preferences.
For ‘Post Priority’, I’ve chosen ‘Comment Count’.
And for the ‘Change Frequencies’ section, I’ve selected the ‘Daily’ option for posts.
Then simply update the options.
Step #4: Add Your Sitemap to Google Search Console
If you haven’t already done so, create a ‘Google Search Console’ (formerly Google Webmaster Tools) account for free here.
Once your account is live, click “Add A Property”, type in your domain, and click “Add”.
Then you verify your ownership by choosing an option.
If you have ‘Google Analytics’ set up, then I recommend that method as your easiest and quickest way to verify your site.
When your site has been verified, you have the green light to add your XML sitemap to your property by clicking the “ADD/TEST SITEMAP” tab, typing sitemap.xml into the box next to your domain, and hitting the “Submit” button.
And voilà! Your sitemap is ready to roll.
Here’s an example of the sitemap data you’ll see as your blog makes progress in Google over the coming months.
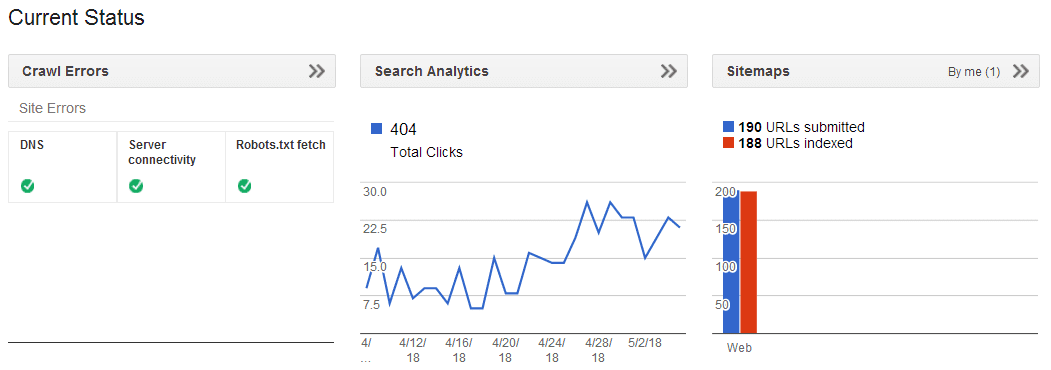
Click to Enlarge.
PS: My site is only 7 months old (at the time of publishing this article), hence the small visitor numbers.
However, don’t panic if there are no results for the “Current Status” of your sitemap right off the bat because it takes a short while for Google to crawl your site and display the data.
#5: Set up a Profile With Google+
This step is essential and is also one that’s overlooked by a number of bloggers.
If you really want to build a real bond with Google and have your content better indexed, then it’s only natural that you create a Google Plus account here and follow me.
I’ll follow you back. Promise. 😉
Not only can you build up a following of folks who will like and share your content on G+, but it will give Google more insights into your content.
Once you get your account, I highly recommend adding your domain to the “Sites – Contributor to” part of your “About me” section too.
Updating this part of your profile will win Google’s trust and can have a positive impact on rankings as well as lead to other great benefits.
#6: Find Golden Keywords For Your Content
Now the technical WordPress SEO stuff is out the way, you can start focusing on the FUN tasks – starting with keyword research!
Before you even write your first blog post or even publish your next one, finding “the right” keywords is of the utmost importance for ranking your content and getting “targeted” traffic that leads to an income on the web.
So with that said, grab my #1 recommended keyword tool (which gives you 30 free searches to start off).
And then the idea is to find “long tail” keywords that are gonna bring you traffic, and ones that also have low competition so you have good chances of raking for them.
Plus it’s highly important that you pick phrases that make grammatical sense.
See a keyword I found using Jaaxy for one of my own blog posts.
Avg = average monthly visitor numbers. You want this number to be at least 40.
Traffic = the expected monthly clicks you’ll get if your post is on page 1 of Google.
QSR = the competitiveness of the keyword. You want this to be less than 100 or as close to 0 as possible.
KQI = the quality of the keyword and its ranking potential.
SEO = whether it’s a great phrase to rank for from an SEO point of view. The closer to a score of 100, the better.
So, I’m now setting you a challenge to use your 30 free searches for finding at least 5 – 10 great keywords for your next 5 -10 blog posts.
TIP: Also include product review keywords within your searches.
For example:
- Product X review
- Product X reviews
- Is Product X a scam
- Is product X legit
- Is product X worth it
- Does product X work
They’re known as “buying keywords” that can result in some great rankings, traffic, and sales. 😉
To get a better understanding of the whole research process and how the metrics work…
==> Read my Article on How to Search For Keywords For SEO and Get Ranked
#7: Write Engaging Content With Keywords
Gone are the days when you could write a 400 – 500-word articles on any old rubbish and easily land on the front page of Google.
Today, you must write quality and helpful articles of at least 1,000 words or preferably 1,500 words if you can.
It’s important that you also write for your “audience” and not the search engines because “real people” will be reading your content, at the end of the day.
The great thing about blogging is that it’s not rocket science either, because if you’re capable of holding a conversation with someone, then it qualifies you as a blogger.
Now, when it comes to keyword placement within your content, it really is a piece of cake.
To get a blog post ranked for a particular keyword, you simply use the keyword within the title of your post. For example:
Please Note: Avoid using just the keyword by itself.
You should include extra text either before and/or after the keyword phrase, like I have done. It’s practiced like this for two very good reasons.
Firstly, it makes the title more engaging for visitors.
Secondly, Google won’t penalize your site which would lead to lost rankings and traffic.
As for adding the keyword to your actual post, all you really need to do is insert it in the first paragraph of your post. For example:
Please Note: It’s also important that your keyword naturally fits into a free-flowing sentence.
But having said that, you can get away without using the exact keyword in your content.
As long as you’ve published words/phrases that directly relate to your keyword, it’s good enough for Google and rankings.
Don’t ask me how it works because Google is such a complicated beast lol.
Please Note: SEO has evolved over the years, so refrain from repeatedly mentioning your keyword in your content because Google sees it as “keyword stuffing”.
It’s what bloggers and “black hatters” did many moons ago to fool Google into giving them top rankings. If you do it today, Google will either ignore it or potentially derank your site.
Naturally mentioning your keyword 2 to 3 times throughout your post is more than enough, in my book.
The Bottom Line: Happy readers = Happy Google, and you’ll get rewarded with rankings.
#8: Structure Content Correctly & Effectively
The layout of your content is extremely important to both your readers and Google.
If it’s done in the correct manner, folks will stay on your site for longer, it will lead to better sales conversions, and your rankings will improve.
Firstly, write your content in a way that’s broken down into small paragraphs. In my opinion, don’t exceed 3 sentences within each paragraph.
Heck, you can even write single sentences like this if you wish.
Let’s face it, nobody likes reading a huge block of content do they?
Not only is it difficult to read, but your readers will get frustrated and quickly exit your site which will send your “Bounce Rate” through the roof and have a negative impact on rankings.
Secondly, use H3/H4 headings to break down your content into sections, making it even easier and enjoyable for your readers.
Each heading you create must relate to the section of content that you’re gonna discuss with your audience.
Also, make your headings descriptive and captivating because “one” word headings can be pretty boring (Z z z) if you ask me.
As you can see in this article you’re reading right now, I’ve used a number of headings for the steps that you can draw inspiration from.
Thirdly, interlink your content.
Look for or create opportunities (phrases) within each blog post that link to other posts and pages on your blog. But the key to this is “relevance”.
For example:
“If you want step-by-step training on how to build a successful blog using SEO, then the Wealthy Affiliate community is your knight in shining armor.”
Ensure that the hyperlinked phrase directly relates to the post or page you’re sending your visitors to.
In addition, the phrase must flow freely within a sentence.
The reason behind this is to provide your readers with more info on certain topics and encourage traffic to flow through many areas of your blog.
Google loves it, I tell ya!
The “Big G” also likes it when you link out to websites within your content – sites like Wikipedia and other resources (including blogs) that provide valuable info, tools, and services, etc.
Just don’t go overkill with external links and you don’t need to include them in every post either.
Finally, sprinkle images throughout your content to make your posts visually appealing to your readers and keep them hanging around longer.
We are now in a new age where folks consume a lot of “visual” content, whether it’s via social media or video channels like YouTube.
And this also applies to blog content too. People just can’t get enough of imagery – especially when it’s SUPER FUN to look at!
The other cool thing about images is that Google also ranks them which means you’ll potentially get some traffic when folks do keyword searches and click on Google’s “Images” tab.
As for actually optimizing your images for SEO, personally, it’s something that I’ve never done for any of my blogs.
I simply just fill out the title and occasionally add a caption.
But it’s entirely your decision when it comes to the ‘Alt Text’ and ‘Description’ fields. It may be beneficial for rankings and result in extra clicks, so it’s worth trying.
One final important aspect to take into account when it comes to uploading images to your blog is to ensure they’re compressed to help maintain the load speed of your site.
So I recommend installing the ‘Smush’ plugin.
Once activated, it’s as easy as pie to use for compressing your images.
Let’s Wrap it up…
Doing SEO for your WordPress blog and getting top rankings in the search engines is easy-peasy when you know how.
“But what about BACKLINKS, Neil?”
I think building backlinks is a tricky subject.
Yes, they can work (if practiced correctly). But on the other hand, if you don’t have a clue what you’re doing and it’s done wrong, it could land your site in hot water with Google.
But with that said, if you consistently publish “high-quality” content and really build your authority online, other bloggers and resources will start naturally linking back to your blog.
In my opinion, that’s the best way to get backlinks.
While no blogger actually knows Google’s “secret algorithmic sauce” – if you follow the steps in my article, you can get rankings and build a super-charged profitable blog.
If you want thorough-step-by-step training on everything discussed in this article, free WordPress blogs, tools, and 24/7 support from a community of 1,000,000+ internet marketers…
==> Join my #1 Recommended Program ($0 to Start!)
Your Friend, Neil 😀
If you have any further questions or thoughts on SEO for WordPress, we’d LOVE to hear your comments below…
I have been doing this for over 4 months now and I’m finally getting some of my pages higher up on google.
I actually have a couple of my articles on the first page of google for my keywords. So that motivates me to keep going and improving, I know there’s still a lot I need to do and learn if I want to be successful but only time will tell!!
That’s AWESOME news, Justin!
Keep choosing those great keywords and writing high-quality content!
It sure is a huge motivator when you see your content ranking and traffic starts flowing to your site!
Building a successful business online is a step-by-step process that takes time. But you’re definitely making great process, so stick with the journey and you’ll find out what comes your way in the long-term. 😀
It’s amazing how far SEO has come. All the major search engines have their own algorithm which provides their users with the most relevant search results.
You mentioned how important it is to write engaging content with the appropriate keywords. Do you think backlinks will become less of a ranking factor for search engines in the future?
I agree, especially since the 90s!!
Today, people require “VALUE”, and if Google + other major engines can’t give folks what they need, then they’ll happily look elsewhere. Which is why doing SEO correctly and writing high-quality engaging blog content is a “must” for success in the search engines.
I think backlinks will always play a role in top rankings. But when “Black Hatters” abuse the backlinking strategy, it makes you wonder what changes Google, Bing, and Yahoo will be making to their algorithms in the future to stop some bloggers taking unfair shortcuts.